Return to the Xequte Home Page  
Products       Store       Support       User Discussion       Contact Us      
 
         
DVD PixPlay, DVD/VCD/Image Slideshow Disk Creator
Tutorial

Creating a slideshow disk for playback on your DVD player is quick and simple.  You can create it automatically using our new Slideshow Wizard or manually using the following steps:

1. Select your images and videos

  If you click the "Add Images" button, you can choose the images and videos for your slideshow using the thumbnail browser.

(You can also drag images from Windows and drop them into PixPlay)

Add Images

Use the left panel of the thumbnail browser to select a folder that contains images or videos.  You can then select the ones you want in your slideshow and click "Add Selected" to insert them .  You can select multiple images by clicking each in turn.

Click the "Add All" button to add all the images in the displayed folder.

The number of images in your slideshow is displayed in the right panel (Frame Count) as well as the duration of the slideshow and the estimated size.  Depending on the type of CD you are writing to, you will need to keep the total size under 600-700 MB.  Both VCD and DVD formats are shown (you can choose the format when you burn your disk)

Generally you will be able to create a slideshow of about an hour on a VCD and 2-3 hours on a DVD.


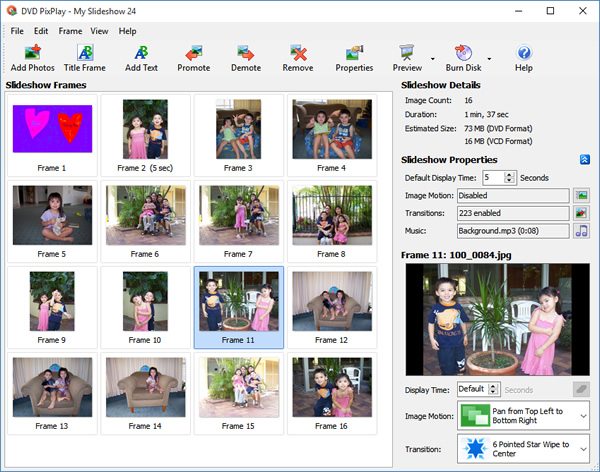
2. Arrange your images and videos

The images and videos in your slideshow are displayed in the main window, where the top-left image is the first frame of the slideshow and the bottom-right images is the last frame.

You can reorder the images using the Promote/Demote buttons or by dragging and dropping them to a new location.

If you want a particular image to have a different display time or motion or transition effect, select the image(s) and change the relevant setting.  You can also select Frame>Frame Properties to remove borders from the images and see previews of the motion and transition effects.


3. Add a Title Page?

  To add a Title Page to your album, click the image in your slideshow where the page should be added then click the "Title Frame" button

A text editing dialog is displayed.  Specify the text you want added, font and colors then click OK.


4. Set your slideshow options


The main settings for your slideshow are displayed in the right panel. 

Others settings can be specified in the Slideshow Properties dialog.

Default Display Time:

Specify the number of seconds that each image in your slideshow is displayed for (except those for which you have set a custom display time).

Motion Effects:

Motion effects add interest to your slideshow by making your images appear as they are moving. Click the relevant button to select your preferred motion effects.

Transition Effects:

Selecting this option enables the use of transitions which smoothes the flipping of one image to the next.  There are 160 different transitions to choose from.

Background Music:

Click the Browse button to select the music tracks to be played during the slideshow.  If the music selection is shorter than the duration of the slideshow then it will be looped.


Click the preview button to see a simulation of the slideshow in action.


5. Create your slideshow

  When you have arranged your slideshow to your liking, click the "Burn Disk" button to output it to a blank CD or DVD disk.

Slideshow Format:

You will need to select your desired Slideshow Format:

VCD: Has the widest compatibility but the quality is not as good as SVCD
SVCD: Has better quality than VCD but takes up more space on the CD than VCD
XVCD: Has the best quality (equivalent to a DVD) but takes up more space on the CD and is less compatible
XSVCD: Similar to XVCD format (equivalent quality to a DVD) but uses SVCD compatibility
DVD: Native DVD movie format. Compatible with all players that support writable disks
Image: This leaves your slideshow as images and videos, and includes a viewer so the slideshow will playback automatically on a PC (not recommended for playback on DVD player)
Image+DVD: Creates a combined DVD and Image format slideshow that offers the best compability and quality on both PC's and DVD players
MPEG: Mainly for creating disk for auto-playback on computers, though supported by many DVD players too

If you are outputting to CD disks, we recommend you first test the VCD format for compatibility and then use the SVCD if you require better quality. If you are using DVD disks, select the DVD format. If you are creating disks primarily for playback on computers you should use the Image or MPEG format.


6. Burn your Disk

The final step of your slideshow creation is the compilation of the slideshow and burning it to CD or DVD.

Select your CD/DVD burner from the drop down list at the top and specify the write speed. 

  You can use the Preview button to build the slideshow and display it before burning. 
 

  When you are ready, insert a blank CD or DVD and click Finish.
 

Note:
For widest compatibility with DVD Players we recommend the use of CD-RW disks rather than CD-R, or DVD-R/DVD+R rather than DVD-RW/DVD+RW
Some DVD Players do not support all DVD PixPlay formats.  If your disk burns correctly but is not played by your DVD player check its compatibility on our support page.
 

Purchase this software now Download a free evaluation


Purchase DVD PixPlay   |   Download DVD PixPlay   |   DVD PixPlay Plug-Ins   |   Upgrade DVD PixPlay

Xequte Home Page  -  Xequte.com Site Map
Copyright Xequte Software 2008