![]()
|
|
Creating a VCD slideshow for playback on your DVD player is quick and simple. These are the steps:
1. Select your images and videos
|
|
If you click the "Add Images" button, you can choose the
images and videos for your slideshow using the thumbnail browser.
(You can also drag images from Windows and drop them into PixPlay) |

Use the left panel of the thumbnail browser to select a folder that contains images or videos. You can then select the ones you want in your slideshow and click "Add Selected" to insert them . You can select multiple images by clicking each in turn.
If you click the "Add All" button then all images in the displayed folder will be added.
| The number of images in your slideshow is displayed in the right panel (Frame Count) as well as the duration of the slideshow and the estimated size. Depending on the type of CD you are writing to, you will need to keep the total size under 600-700 MB. Both VCD and SVCD format are shown (you can choose the format when you write to CD) | 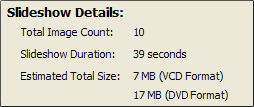 |
2. Arrange your images and videos
The images and videos in your slideshow are displayed in the main window, where the top-left image is the first frame of the slideshow and the bottom-right images is the last frame.

You can reorder the images using the Promote/Demote buttons or by dragging and dropping them to a new location.

If you want a particular image to have a different display time or transition to those in the album, select the image(s) and change the value.
3. Add a Title Page?
|
|
To add a Title Page to your album, click the image in your slideshow where the page should be added then click the "Title Frame" button |

A text editing dialog is displayed. Specify the text you want added, font and colors then click OK.
4. Set your slideshow options
|
|
The main settings for your slideshow are displayed in the right panel. Others are specified when you write to CD. |
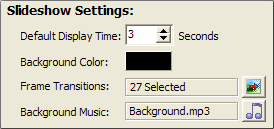
Default Display Time:
Specify the number of seconds that each image in your slideshow is displayed for (except those for which you have set a custom display time).
Background Color:
Click to select the color that is displayed around your images.
Display Transitions:
Selecting this option enables the use of transitions which smoothes the flipping of one image to the next using a blend technique. There are 160 different transitions to choose from.
Background Music:
Click the Browse button to select the music tracks to be played during the slideshow. If the music selection is shorter than the duration of the slideshow then it will be looped.
|
|
Click the preview button to see a simulation of the slideshow in action. |
5. Create your slideshow
|
|
When you have arranged your slideshow to your liking, click the "Create CD" button to output it to a blank CD or DVD disk. |
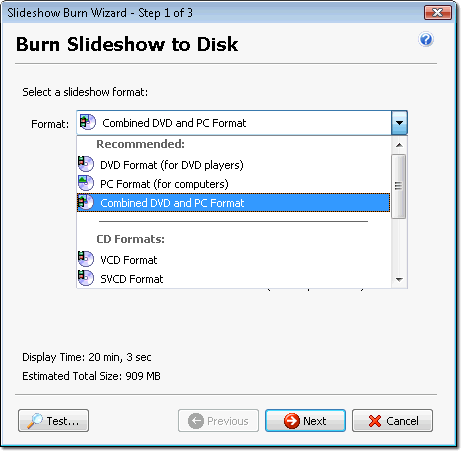
Slideshow Format:
You will need to select your desired VCD Format:
VCD: Has the widest compatibility but the quality is not as good as SVCD
SVCD: Has better quality than VCD but takes up more space on the CD than VCD
XVCD: Has the best quality (equivalent to a DVD) but takes up more space on the CD and is less compatible
SXVCD: Similar to XVCD format (equivalent quality to a DVD) but uses SVCD compatibility
Original Format: This leaves your slideshow as images and videos, and includes a viewer so that the slideshow will playback automatically on a PC (not recommended for playback on DVD player)
MPEG: Mainly for creating disk for auto-playback on computers, though supported by many DVD players too
We recommend the first test the VCD format for compatibility and then use the SVCD if you require better quality. If you are creating disks for playback on computers you should use the "Original" format option. View our VCD format definition for more information.
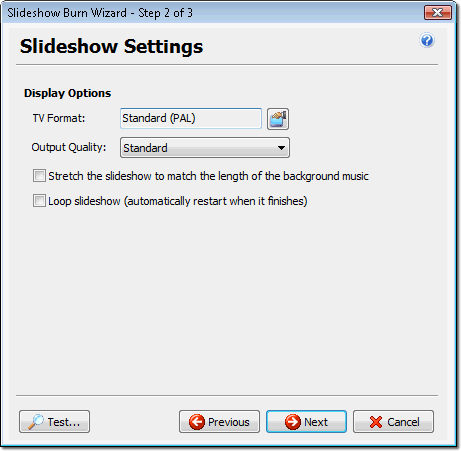
Slideshow Settings:
You also need to set the destination television format:
NTSC: Used throughout North and South America and Japan
PAL: Used in Europe, Australia, NZ and Africa
6. Write your CD
The final step of your slideshow creation is the compilation of the slideshow and writing it to CD.
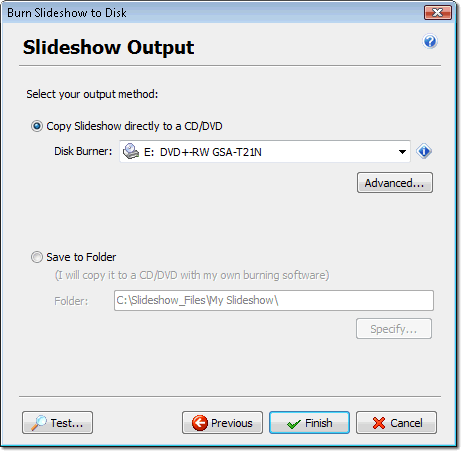
Select your CD-ROM from the drop down list at the top and specify the write speed. If you have any problems you might want to reduce the write speed or modify the advanced settings.
If you are using a CD-RW and are not sure if it is blank, select the Erase option to clear all the existing content.
|
|
You can use the Preview button to "pre-build" the slideshow and display it. | |
|
|
When you are ready, insert a blank CD and click Finish. |
Note:
| For widest compatibility with DVD Players we recommend the use of CD-RW disks rather than CD-R | |
| Some DVD Players do not support VCD and/or SVCD format. If your CD writes correctly but is not played by your DVD player check its compatibility on our support page. |